本文记录和讲解我的博客的使用。
Markdown
Markdown 是一种轻量级的专为写作而生的标记语言,其语法十分简单,常用的标记符号不超过十个。
Typora
Typora 是一个 Markdown 文件编辑器,最大的特色是命令式的实时预览,一旦熟悉了 Markdown 语法,写作体验极好。其全平台支持,可到官网 下载,但目前这款软件已开始收费。
MarkText
MarkText,绝对是 Typora 的最佳替代品,它开源免费,本人强烈推荐,请前往它的 GitHub 发布页面下载安装使用。
书写博文
通过执行hexo new post <自定义 md 文件名>,相应 Markdown 文件将在 _posts 下生成,我们可以使用 MarkText 打开该 Markdown 文件书写博文。
以下动图为一开始使用 Typora 录制,只是便于对博文书写语法进行讲解,其同样适用于 MarkText。
标题
使用#可表示 1-6 级标题。一级标题对应一个 #,二级标题对应两个 # ,以此类推,如下图(注意 # 后面有一个空格):
脚注
不多说了,看图吧:
有序列表
使用<序号>.(.后面有一个空格)可表示有序列表,若<序号>.之后接了实际内容,则回车自动生成下一项,如没有实际内容,回车回到正文:
无序列表
使用-(-后面有空格)可表示无序列表,若-之后接了实际内容,则回车自动生成下一项,如没有实际内容,回车回到正文:
任务列表
使用- [ ]([ ]后面有空格)可表示任务列表,若- [ ]之后接了实际内容,则回车自动生成下一项,如没有实际内容,回车回到正文:
以上三种列表之间可以相互嵌套,只需在敲子列表前敲四个空格即可。
代码段
用一对单个反引号把代码包起来即可:
代码块
先敲三个反引号再回车,就能生成一个空代码块,粘贴进代码就可以了,右下方可以指定语言,会有相应的高亮显示:
其实以上表示代码块的语法是 Typora 对 Markdown 语法的简化,可使用Ctrl+/切换到源代码模式,可看到是一对三个反引号包起来即表示代码块。
链接
先用一对中括号包裹链接文本,再用一对小括号包裹地址:
插入图片
先敲一个!,再用一对中括号包裹图片描述,最后敲一对小括号就可以选择图片插入:
博客构建仓库
现在,虽然博文没写几篇,我已经遇到了这样两个问题:换了一台电脑怎么办?博客构建目录怎么备份?
直接使用 U 盘显然是非常原始愚蠢的办法,这时,我想到了最流行的分布式版本控制系统 Git 和全球最大的代码托管平台 GitHub。
使用 Git 管理博客构建目录并托管到 GitHub
进入 Github 首页 ,右上角的加号处创建仓库,仓库名自定义,如 blog。
进入<博客构建目录>,初始化一个 Git 项目:
将全部文件添加进暂存区:
提交到本地版本库(第一次):
添加远程版本库(仓库)地址:
1 git remote add origin git@github.com:<自己的GitHub用户名>/blog.git
推送到远程版本库(仓库):
1
2
git branch -M main git push -u origin main
这时你可以看到 GitHub 上刚建的仓库中出现了博客构建目录下的一些文件,你仔细和本地比对后可能会有以下问题。
少了一些文件夹,比如 node_modules、public 和 .deploy_git,这是怎么回事?
其实这是正常的,这些文件在 .gitignore 中被指定,被 Git 忽略了,因为这些文件都是衍生文件,根本不重要,比如 node_modules 文件夹可以通过 npm install 生成。
少了主题文件夹!难道这个也被 Git 忽略了?.gitignore 没指定啊。
是的,主题文件夹也被忽略了,但是是由于我们当初是通过git clone下载的主题,其本身也是一个 Git 项目,拥有自己的仓库,这种情况推荐的做法是将该 Git 项目添加为子项目。
将主题添加为子项目
访问主题仓库 ,点击右上方的 Fork,创建一个自己的分支。
删除主题文件夹,执行以下命令将主题设置为子项目。
1 git submodule add -b master git@github.com:next-theme/hexo-theme-next.git themes/next
提交到本地版本库:
1
2
git add . git commit -m "将主题添加为子项目"
推送到远程版本库(仓库):
这时你可以看到 GitHub 上的仓库中主题文件夹出来了,点开后跳到自己的分支。
以上不仅实现了博客构建目录的备份,更将博客构建目录变成了一个 Git 项目。那么如何多端书写博文呢?
多端书写
我们换了一台新电脑后,需要五步进行多端书写:
安装 Node.js,安装 hexo-cli;
安装和配置 Git,执行以下命令克隆博客构建仓库;
1 git clone --recursive git@github.com:<自己的GitHub用户名>/blog.git
安装依赖:
这时进行本地预览(hexo s),你会发现你的博客原封不动的回来了。
书写完博文后更新博客构建仓库:
1
2
3
git add . git commit -m ":memo:" git push
更新博客:hexo g -d。
更新博客后,所有文章的更新时间都变成了最近的时间如果我们不自己在每篇文章的 front-matter(即文章的 MD 文件开头那部分)中设定 updated 的值,如果我们不能接受这一情况,则需要自己设定一下 updated 的值,格式同"2023-08-12 11:15:15"。
hexo-cli,只是 hexo 的命令行接口,它的作用是方便我们执行 hexo 的相关命令,我们只是在第一次初始化一个 hexo 博客时需要真正使用到它(hexo init),我们常用的hexo clean、hexo g -d其实都是来自于 hexo 这个 npm 包,而其是作为我们构建博客的一个依赖被安装的,所以,在一台新电脑上,我们完全不必再次安装 hexo-cli,而是直接在博客构建目录下调用 hexo,观察到 package.json 中定义了以下几个 NPM 命令,其实 hexo 官方已经给我们设定好了,即npm run build就是调用hexo generate,npm run deploy就是调用hexo deploy,其他同理,那么,在以上多端书写五个步骤中,就可以省略掉安装 hexo-cli 并将最后一步命令替换为npm run build && npm run deploy。
1
2
3
4
5
6
7
8
... "scripts" : { "build" : "hexo generate" , "clean" : "hexo clean" , "deploy" : "hexo deploy" , "server" : "hexo server" } , ...
持续集成
虽然实现了多端书写,但是操作起来也挺麻烦的。换电脑要重新配置环境,书写完博文除了要部署博客,还要更新博客构建仓库,这时, GitHub Actions 就派上用场了。
GitHub Actions 可以简单理解为可以让你在云端对自己的仓库进行一系列的命令,对于免费用户,每月有 2000 分钟的使用时间。
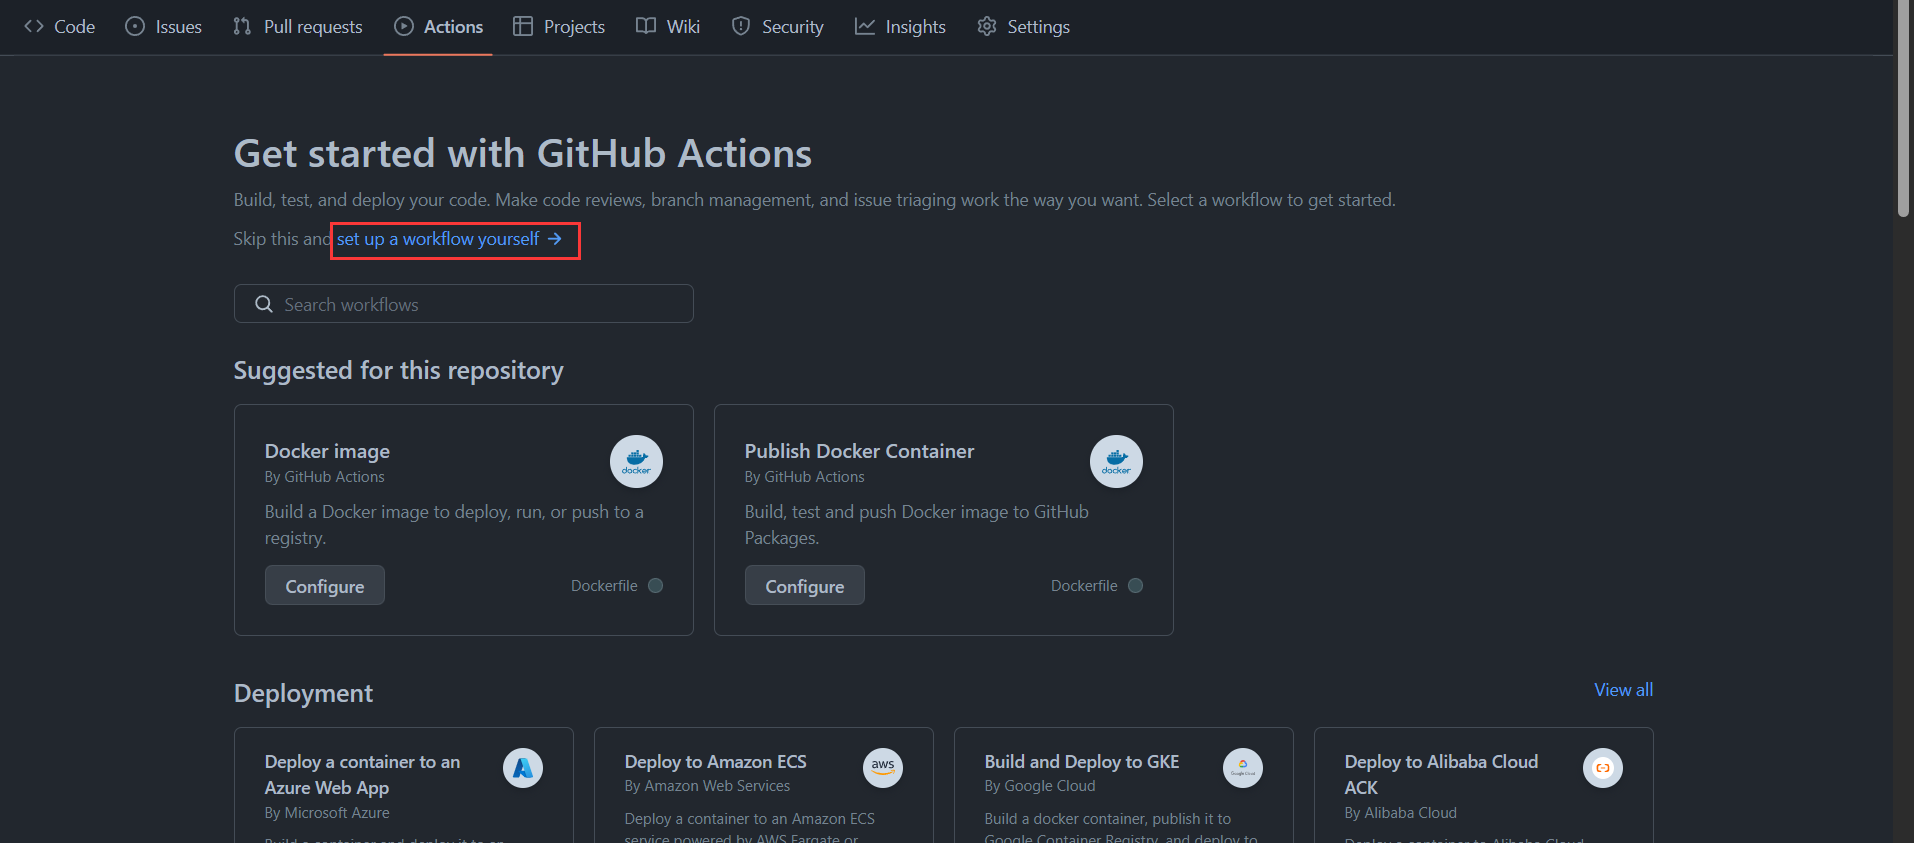
前往博客构建仓库,创建一个工作流文件(一个 yml 文件):
重命名此 yml 文件为 hexo-build.yml,复制粘贴以下内容:
1
2
3
4
5
6
7
8
9
10
11
12
13
14
15
16
17
18
19
20
21
22
23
24
25
26
27
28
29
30
31
32
33
34
35
36
37
38
39
40
41
42
43
44
45
46
47
48
49
50
51
52
name: hexo-build on: push: branches: - main env: TZ: Asia/Shanghai jobs: blog-build: runs-on: ubuntu-latest steps: - name: Checkout uses: actions/checkout@v3 with: submodules: true - name: Install Node.js v12.14.0 uses: actions/setup-node@v3 with: node-version: "12.14.0" cache: "npm" - name: Cache dependencies uses: actions/cache@v3 id: cache-dependencies with: path: node_modules key: ${{runner.OS}}-${{hashFiles('**/package-lock.json')}} - name: Install dependencies if: steps.cache-dependencies.outputs.cache-hit != 'true' run: npm ci - name: Setup private rsa key env: DEPLOY_KEY: ${{secrets.DEPLOY_KEY}} run: | mkdir -p ~/.ssh/ echo "$DEPLOY_KEY" > ~/.ssh/id_rsa chmod 600 ~/.ssh/id_rsa ssh-keyscan github.com >> ~/.ssh/known_hosts ssh-keyscan gitee.com >> ~/.ssh/known_hosts - name: Deploy run: | git config --global user.name "${{secrets.GIT_NAME}}" git config --global user.email "${{secrets.GIT_EMAIL}}" npm run build && npm run deploy
1
2
3
4
5
6
7
8
9
10
11
12
13
14
15
16
17
18
19
20
21
22
23
24
25
26
27
28
29
30
31
32
33
34
35
36
37
38
39
40
41
42
43
name: hexo-build on: push: branches: - main env: TZ: Asia/Shanghai jobs: blog-build: runs-on: ubuntu-latest steps: - name: Checkout uses: actions/checkout@v3 with: submodules: true - name: Install Node.js v12.14.0 uses: actions/setup-node@v3 with: node-version: "12.14.0" cache: "npm" - name: Cache dependencies uses: actions/cache@v3 id: cache-dependencies with: path: node_modules key: ${{runner.OS}}-${{hashFiles('**/package-lock.json')}} - name: Install dependencies if: steps.cache-dependencies.outputs.cache-hit != 'true' run: npm ci - name: Setup private rsa key env: DEPLOY_KEY: ${{secrets.DEPLOY_KEY}} run: | mkdir -p ~/.ssh/ echo "$DEPLOY_KEY" > ~/.ssh/id_rsa chmod 600 ~/.ssh/id_rsa ssh-keyscan github.com >> ~/.ssh/known_hosts ssh-keyscan gitee.com >> ~/.ssh/known_hosts - name: Deploy run: | git config --global user.name "${{secrets.GIT_NAME}}" git config --global user.email "${{secrets.GIT_EMAIL}}" npm run build && npm run deploy
先别着急提交以上内容,在这个工作流文件中,存在 ${{}} 这种格式的东西,这是我们工作流需要使用到的变量,需要提前指定一下。
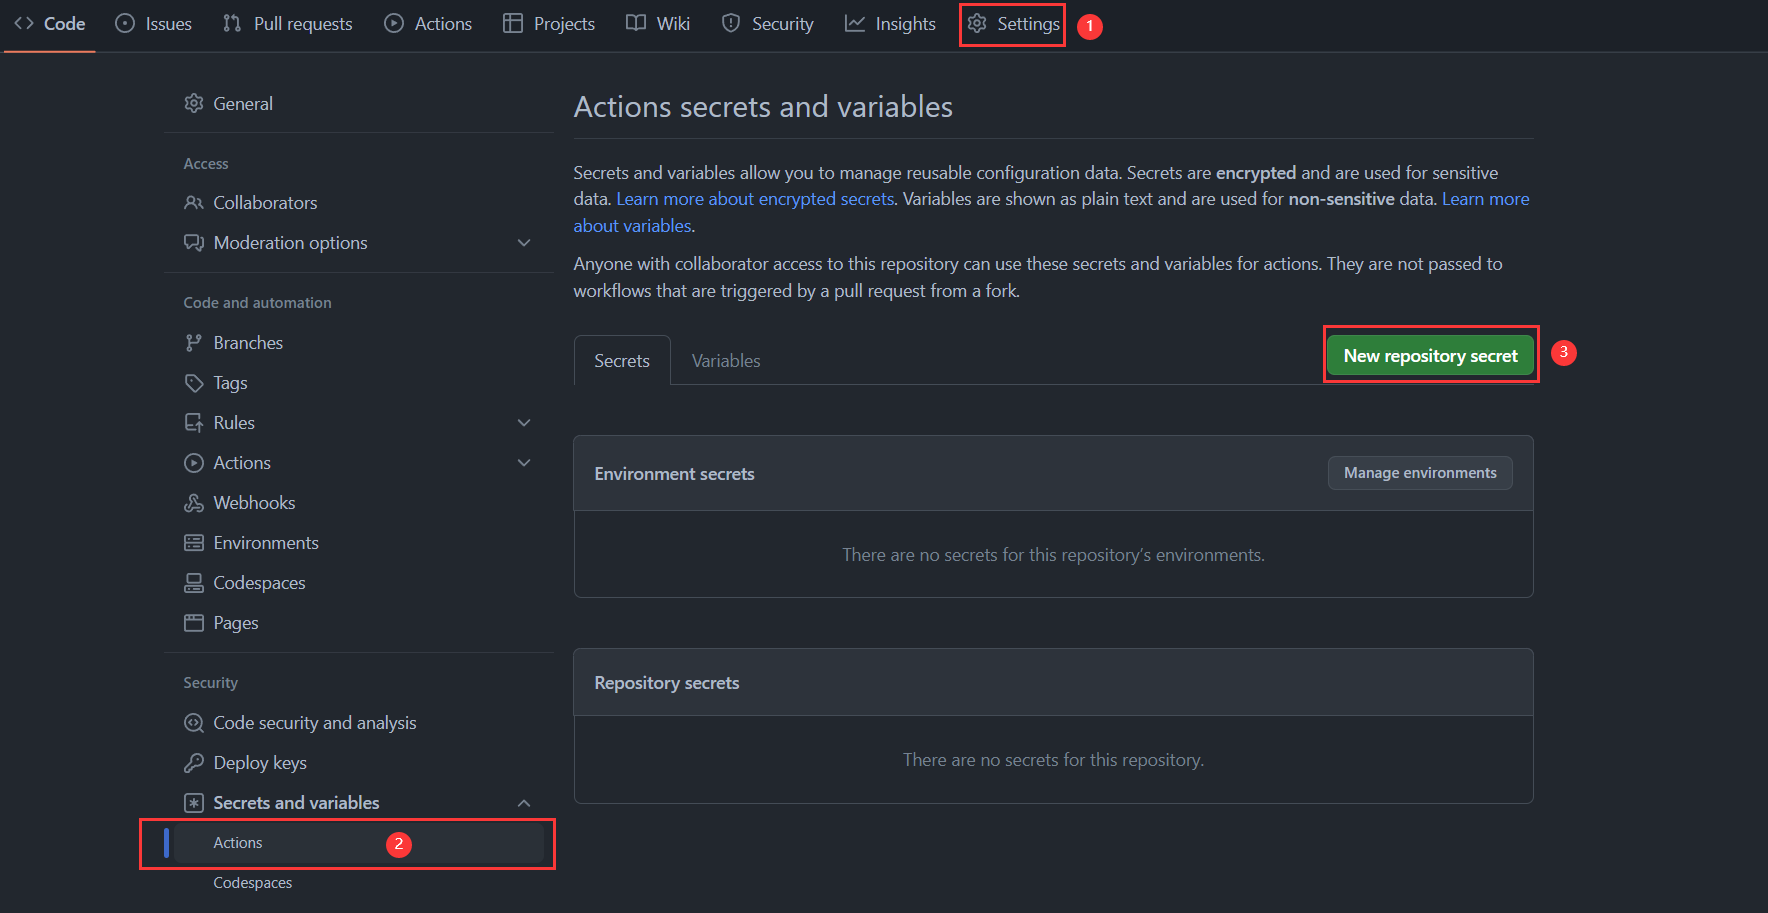
前往博客构建仓库(再开一个浏览器标签页),添加变量(会被加密):
指定 DEPLOY_KEY 的值,此值为我们电脑用户文件夹下 .ssh 下 id_rsa 的内容,即私钥,该私钥在安装和配置 Git 时生成。
指定 GIT_NAME 的值,即自己的 GitHub 用户名。
指定 GIT_EMAIL 的值,即自己的 GitHub 邮箱。
指定好后就可以提交 hexo-build.yml,之后会看到工作流进行中,最终完成。
这样以后对于任何一台新电脑,只需要三步即可多端书写:
安装和配置 Git,执行以下命令克隆博客构建仓库;
1 git clone --recursive git@github.com:<自己的GitHub用户名>/blog.git
安装依赖:
书写完博文后更新博客构建仓库:
1
2
3
git add . git commit -m ":memo:" git push
【优化】增量生成
观察 GitHub Actions 工作流日志,每次执行npm run build都是生成全量的博客源文件,这看起来也没什么问题,但是要是以后文章数量多起来,这个执行起来可老花时间了。
对于npm run build这个命令,也就是实际执行的hexo generate,其默认就是会增量生成博客源文件,前提是当前目录下存在目录 public(也就是旧版的全量的博客源文件)和缓存文件 db.json。于是,优化工作流文件 hexo-build.yml 如下,旧版的全量的博客源文件从博客源文件版本库下载即可,缓存文件 db.json 第一次生成之后上传为构件以供下一次工作流下载。
1
2
3
4
5
6
7
8
9
10
11
12
13
14
15
16
17
18
19
20
21
22
23
24
25
26
27
28
29
30
31
32
33
34
35
36
37
38
39
40
41
42
43
44
45
46
47
48
49
50
51
52
53
54
55
56
57
58
59
60
61
62
63
64
65
66
67
68
69
70
71
72
name: hexo-build # 仓库main分支有推送时执行jobs下定义的任务 on: push: branches: - main # 设置时区为上海 env: TZ: Asia/Shanghai jobs: # 定义名为blog-build的任务 blog-build: # 定义运行的操作系统 runs-on: ubuntu-latest # 定义步骤 steps: # 签出仓库的默认分支,此处即为main,同时迁出子项目,此处即为主题仓库 - name: Checkout uses: actions/checkout@v3 with: submodules: true # 安装v12.14.0的Node.js,同时进行全局缓存 - name: Install Node.js v12.14.0 uses: actions/setup-node@v3 with: node-version: "12.14.0" cache: "npm" # 缓存文件夹node_modules并生成唯一码 - name: Cache dependencies uses: actions/cache@v3 id: cache-dependencies with: path: node_modules key: ${{runner.OS}}-${{hashFiles('**/package-lock.json')}} # 如果唯一码比对不成功,重新安装依赖,成功则沿用缓存 - name: Install dependencies if: steps.cache-dependencies.outputs.cache-hit != 'true' run: npm ci - name: Setup private rsa key env: DEPLOY_KEY: ${{secrets.DEPLOY_KEY}} run: | mkdir -p ~/.ssh/ echo "$DEPLOY_KEY" > ~/.ssh/id_rsa chmod 600 ~/.ssh/id_rsa ssh-keyscan github.com >> ~/.ssh/known_hosts ssh-keyscan gitee.com >> ~/.ssh/known_hosts + - name: Download PUBLIC + run: | + # 下载自己的GitHub用户仓库,下载的文件为master.zip + curl -LsO https://github.com/ql-isaac/<自己的Github用户名>.github.io/archive/refs/heads/master.zip + # 解压 + unzip master.zip -d . + # 重命名为public + mv <自己的Github用户名>.github.io-master/ public + - name: Download DB + uses: dawidd6/action-download-artifact@v2 + continue-on-error: true # 构件最多只能保存90天,90天过后这一步会报错,设置成报错继续执行 + with: + github_token: ${{secrets.GITHUB_TOKEN}} + name: "DB" - name: Generate and deploy run: | git config --global user.name "${{secrets.GIT_NAME}}" git config --global user.email "${{secrets.GIT_EMAIL}}" npm run build && npm run deploy + - name: Upload DB for next workflow to download + uses: actions/upload-artifact@v3 + with: + name: "DB" + path: db.json + retention-days: 90
1
2
3
4
5
6
7
8
9
10
11
12
13
14
15
16
17
18
19
20
21
22
23
24
25
26
27
28
29
30
31
32
33
34
35
36
37
38
39
40
41
42
43
44
45
46
47
48
49
50
51
52
53
54
55
56
57
58
59
60
name: hexo-build on: push: branches: - main env: TZ: Asia/Shanghai jobs: blog-build: runs-on: ubuntu-latest steps: - name: Checkout uses: actions/checkout@v3 with: submodules: true - name: Install Node.js v12.14.0 uses: actions/setup-node@v3 with: node-version: "12.14.0" cache: "npm" - name: Cache dependencies uses: actions/cache@v3 id: cache-dependencies with: path: node_modules key: ${{runner.OS}}-${{hashFiles('**/package-lock.json')}} - name: Install dependencies if: steps.cache-dependencies.outputs.cache-hit != 'true' run: npm ci - name: Setup private rsa key env: DEPLOY_KEY: ${{secrets.DEPLOY_KEY}} run: | mkdir -p ~/.ssh/ echo "$DEPLOY_KEY" > ~/.ssh/id_rsa chmod 600 ~/.ssh/id_rsa ssh-keyscan github.com >> ~/.ssh/known_hosts ssh-keyscan gitee.com >> ~/.ssh/known_hosts + - name: Download PUBLIC + run: | + curl -LsO https://github.com/ql-isaac/<自己的Github用户名>.github.io/archive/refs/heads/master.zip + unzip master.zip -d . + mv <自己的Github用户名>.github.io-master/ public + - name: Download DB + uses: dawidd6/action-download-artifact@v2 + continue-on-error: true + with: + github_token: ${{secrets.GITHUB_TOKEN}} + name: "DB" - name: Generate and deploy run: | git config --global user.name "${{secrets.GIT_NAME}}" git config --global user.email "${{secrets.GIT_EMAIL}}" npm run build && npm run deploy + - name: Upload DB for next workflow to download + uses: actions/upload-artifact@v3 + with: + name: "DB" + path: db.json + retention-days: 90
【优化】增量部署
观察我们的 GitHub 用户仓库,也就是我们的博客源文件版本库,无论我们更新多少次博客,提交历史总是两条,这个是由于使用的npm run deploy,也就是实际执行的hexo deploy,其会在当前目录下寻找目录.deploy_git,如果没有就自己创建一个,将其初始化为一个版本库并将目录 public 里的文件复制进去进行提交。
如果当前目录有.deploy_git,也就是有旧版的博客源文件版本库,hexo deploy同样会将目录 public 里的文件复制进.deploy_git 中,这时博客源文件会发生合并,Git 会发现哪些文件发生了变化且只会对这些文件进行提交。于是优化工作流文件 hexo-build.yml 如下。
1
2
3
4
5
6
7
8
9
10
11
12
13
14
15
16
17
18
19
20
21
22
23
24
25
26
27
28
29
30
31
32
33
34
35
36
37
38
39
40
41
42
43
44
45
46
47
48
49
50
51
52
53
54
55
56
57
58
59
60
61
62
63
64
65
66
67
68
69
70
71
72
73
74
75
name: hexo-build # 仓库main分支有推送时执行jobs下定义的任务 on: push: branches: - main # 设置时区为上海 env: TZ: Asia/Shanghai jobs: # 定义名为blog-build的任务 blog-build: # 定义运行的操作系统 runs-on: ubuntu-latest # 定义步骤 steps: # 签出仓库的默认分支,此处即为main,同时迁出子项目,此处即为主题仓库 - name: Checkout uses: actions/checkout@v3 with: submodules: true # 安装v12.14.0的Node.js,同时进行全局缓存 - name: Install Node.js v12.14.0 uses: actions/setup-node@v3 with: node-version: "12.14.0" cache: "npm" # 缓存文件夹node_modules并生成唯一码 - name: Cache dependencies uses: actions/cache@v3 id: cache-dependencies with: path: node_modules key: ${{runner.OS}}-${{hashFiles('**/package-lock.json')}} # 如果唯一码比对不成功,重新安装依赖,成功则沿用缓存 - name: Install dependencies if: steps.cache-dependencies.outputs.cache-hit != 'true' run: npm ci - name: Setup private rsa key env: DEPLOY_KEY: ${{secrets.DEPLOY_KEY}} run: | mkdir -p ~/.ssh/ echo "$DEPLOY_KEY" > ~/.ssh/id_rsa chmod 600 ~/.ssh/id_rsa ssh-keyscan github.com >> ~/.ssh/known_hosts ssh-keyscan gitee.com >> ~/.ssh/known_hosts - - name: Download PUBLIC + - name: Download and clone PUBLIC run: | # 下载自己的GitHub用户仓库,下载的文件为master.zip curl -LsO https://github.com/ql-isaac/<自己的Github用户名>.github.io/archive/refs/heads/master.zip # 解压 unzip master.zip -d . # 重命名为public mv <自己的Github用户名>.github.io-master/ public + # 克隆自己的GitHub用户仓库,重命令为.deploy_git + git clone git@github.com:ql-isaac/<自己的Github用户名>.github.io.git .deploy_git - name: Download DB uses: dawidd6/action-download-artifact@v2 continue-on-error: true # 构件最多只能保存90天,90天过后这一步会报错,设置成报错继续执行 with: github_token: ${{secrets.GITHUB_TOKEN}} name: "DB" - name: Generate and deploy run: | git config --global user.name "${{secrets.GIT_NAME}}" git config --global user.email "${{secrets.GIT_EMAIL}}" npm run build && npm run deploy - name: Upload DB for next workflow to download uses: actions/upload-artifact@v3 with: name: "DB" path: db.json retention-days: 90
1
2
3
4
5
6
7
8
9
10
11
12
13
14
15
16
17
18
19
20
21
22
23
24
25
26
27
28
29
30
31
32
33
34
35
36
37
38
39
40
41
42
43
44
45
46
47
48
49
50
51
52
53
54
55
56
57
58
59
60
61
62
name: hexo-build on: push: branches: - main env: TZ: Asia/Shanghai jobs: blog-build: runs-on: ubuntu-latest steps: - name: Checkout uses: actions/checkout@v3 with: submodules: true - name: Install Node.js v12.14.0 uses: actions/setup-node@v3 with: node-version: "12.14.0" cache: "npm" - name: Cache dependencies uses: actions/cache@v3 id: cache-dependencies with: path: node_modules key: ${{runner.OS}}-${{hashFiles('**/package-lock.json')}} - name: Install dependencies if: steps.cache-dependencies.outputs.cache-hit != 'true' run: npm ci - name: Setup private rsa key env: DEPLOY_KEY: ${{secrets.DEPLOY_KEY}} run: | mkdir -p ~/.ssh/ echo "$DEPLOY_KEY" > ~/.ssh/id_rsa chmod 600 ~/.ssh/id_rsa ssh-keyscan github.com >> ~/.ssh/known_hosts ssh-keyscan gitee.com >> ~/.ssh/known_hosts - - name: Download PUBLIC + - name: Download and clone PUBLIC run: | curl -LsO https://github.com/ql-isaac/<自己的Github用户名>.github.io/archive/refs/heads/master.zip unzip master.zip -d . mv <自己的Github用户名>.github.io-master/ public + git clone git@github.com:ql-isaac/<自己的Github用户名>.github.io.git .deploy_git - name: Download DB uses: dawidd6/action-download-artifact@v2 continue-on-error: true with: github_token: ${{secrets.GITHUB_TOKEN}} name: "DB" - name: Generate and deploy run: | git config --global user.name "${{secrets.GIT_NAME}}" git config --global user.email "${{secrets.GIT_EMAIL}}" npm run build && npm run deploy - name: Upload DB for next workflow to download uses: actions/upload-artifact@v3 with: name: "DB" path: db.json retention-days: 90
云端开发
现在,终于不用担心换电脑的问题了,终于可以好好写博文了,但是现实情况是博文还是没写几篇,反而深陷各种主题尝试、调试和魔改无法自拔,往往是这里还想改一下,但是没电脑在身边,只有平板或者手机。GitHub 真是懂我们的心思,它带着 Codespaces 来了。
在博客构建仓库创建一个 Codespace:
默认使用的是一个多用镜像,拥有 Python、Node.js、Docker 等多个开发环境,我们可以自定义一个开发环境:
访问 Visual Studio Code 命令面板(Shift+Command+P / Ctrl+Shift+P),输入“add dev”。单击“Codespaces: Add Dev Container Configuration Files…”;
单击“Create a new configuration…”;
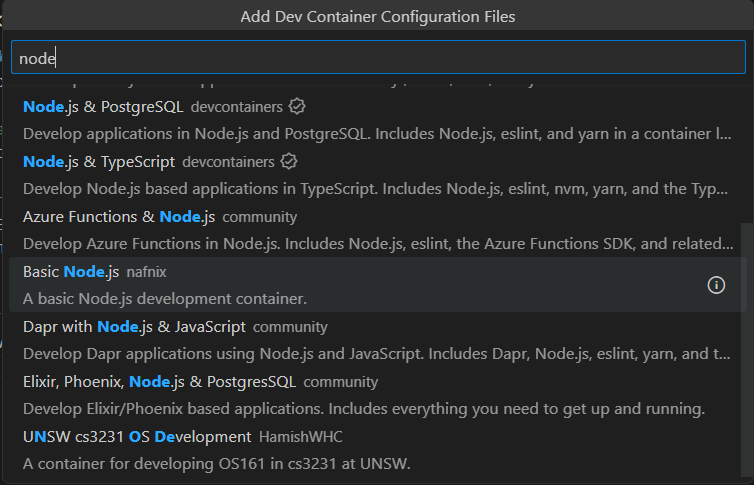
单击“Show All Definitions…”;
输入“node”,单击“Basic Node.js”;
单击“18-bullseye”;
确定。
修改生成的 Dockerfile,设定时区、安装 Vim:
1
2
3
4
5
6
7
8
9
10
11
12
FROM library/node:18-bullseye + +ENV TZ="Asia/Shanghai" + ARG DEBIAN_FRONTEND=noninteractive RUN apt update \ - && apt install -y --no-install-recommends sudo \ + && apt install -y --no-install-recommends sudo vim \ && apt autoremove -y \ && rm -rf /var/lib/apt/lists/* \ && echo "node ALL=(ALL) NOPASSWD: ALL" >/etc/sudoers.d/node \ && chmod 0440 /etc/sudoers.d/node
修改生成的 devcontainer.json,更改开发环境的 name 为 Hexo,定义生命周期脚本:
1
2
3
4
5
6
7
8
9
{ - "name": "Basic Node.js", + "name": "Hexo", "build": { "dockerfile": "Dockerfile" }, - "remoteUser": "node" + "remoteUser": "node", + "postCreateCommand": "mkdir -p ~/.ssh/ && echo \"$DEPLOY_KEY\" > ~/.ssh/id_rsa && chmod 600 ~/.ssh/id_rsa && ssh-keyscan github.com >> ~/.ssh/known_hosts && sudo npm install -g hexo-cli && cd ${containerWorkspaceFolder} && rm -rf node_modules && npm ci", + "postStartCommand": "hexo clean && hexo generate" }
访问 Visual Studio Code 命令面板(Shift+Command+P / Ctrl+Shift+P),输入“rebuild”。单击“Codespaces: Rebuild Container”,rebuild。
这样,一个适合 Hexo 的开发环境就配置好了,可自行阅读官方文档 进行自定义。
最后将更改提交并推送:
1
2
3
git add . git commit -m ":construction_worker: 使用Codespaces" git push


 WeChat